
 Yahoo Sport


Australia sneak home in final over against South Africa in low-scoring Twenty20 World Cup thriller
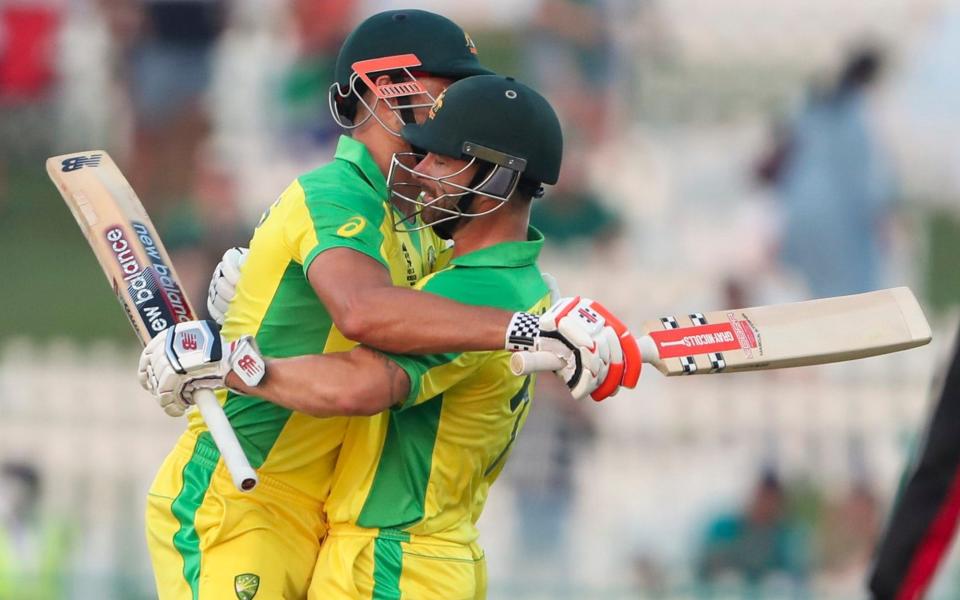
Marcus Stoinis and Matthew Wade combined in a crucial 40-run stand to help Australia beat South Africa by five wickets in a low-scoring thriller in their opening Super 12 clash in the Twenty20 World Cup on Saturday.
Stoinis and Wade held their nerve superbly during an unbroken sixth-wicket stand to take Australia past their 119-run target with the win coming with two balls remaining.
Replying to South Africa's total of 118 for nine, Australia lost three quick wickets at the top and found themselves under pressure against some accurate bowling.
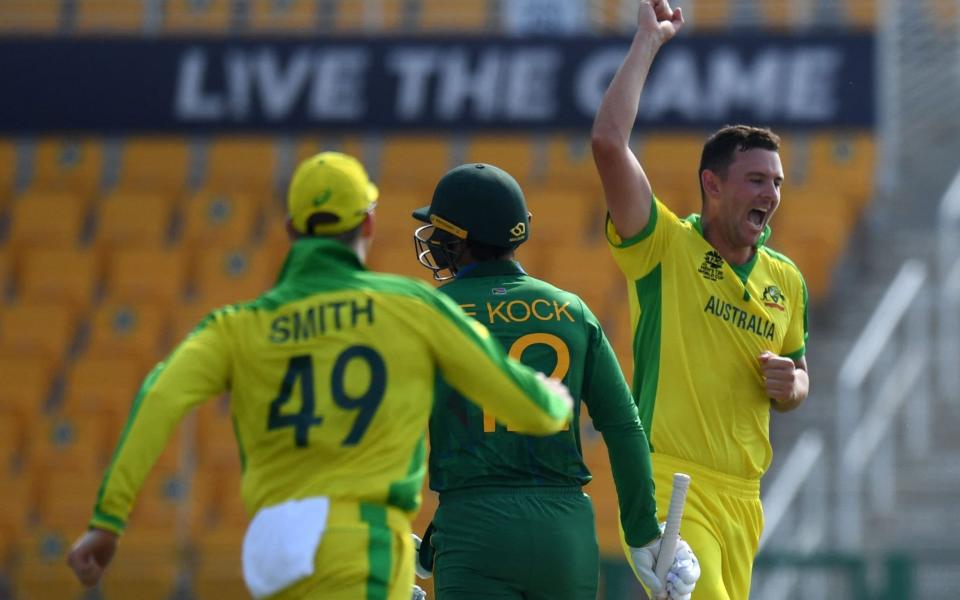
Steve Smith, who made 35, and Glenn Maxwell added 42 for the fourth wicket to keep Australia on course but South Africa came roaring back into the see-saw contest by dismissing both in the space of four deliveries to reduce their opponents to 81-5.
But Stoinis then hit 24 off 16 while Wade contributed 15 runs to shut out South Africa's chances.
Analysis: Australia's oddly-shaped line-up works... this time
Australia this T20 World Cup are an intriguing case study. Can a side overcome a lack of form and clear understanding of their roles through talent alone?
Against South Africa in Abu Dhabi in the opening game of the Super 12 phase of the World Cup, the answer was - just about - yes.
After an outstanding display with the ball, led by Josh Hazlewood, who thrived with a similar short-of-a-length method that he excels with in the longer game, Australia stumbled in their pursuit of a meagre 119. When Glenn Maxwell was clean bowled attempting a switch hit, Australia were reduced to 81-5, still needing 38 from 4.4 overs, an equation that reached 33 off only 20 balls.
There was a very real prospect that South Africa would set a new record for the lowest score successfully defended in the T20 World Cup. Instead, Matthew Wade slammed Kagiso Rabada past mid-off and then ramped him for another boundary. Marcus Stoinis then finished off proceedings with two balls to spare, as South Africa were forced to bowl Dwaine Pretorius, their fifth bowler, at the death.
Wade and Stoinis didn’t just ensure Australia a successful start to the competition. They also provided, in the short-term at least, vindication for Australia’s strategy.
The questions about Australia have not centred on the quality of their personnel. Instead, they have concerned whether 11 players that feel more like an Australia all-star side than a genuine T20 team, with players thrust into roles they are unfamiliar with in the domestic game, can flourish. Rather than a coherent T20 line-up in the normal sense - of openers, spin hitters in the middle order and then finishers - Australia’s top seven comprises six players who are best-suited to batting in the top three, alongside the dynamism of Glenn Maxwell.
Wade and Stoinis embody the peculiar construction of the Australian team. Both have earned their selection through dominating the Big Bash in recent years - but as openers. In domestic T20, Wade hasn’t batted as low as seven, his position for Australia, since 2016.

Even as their faith in Wade and Stoinis in unfamiliar roles was rewarded, Australia were reminded of batting concerns elsewhere. Skipper Aaron Finch, who has been woefully short of cricket, slashed Anrich Nortje to third man to fall for a duck; David Warner mustered only 14 until slicing Rabada to backward point.
But while South Africa defended tigerishly, bowling with nous and aggression, it always seemed outlandish to think they could defend such a paltry total. From the moment Maxwell bowled Temba Bavuma in the second over of the game, South Africa’s innings was bereft of any sense of energy.
If Hazlewood was Australia’s best bowler, the most significant performance came from Maxwell. His four overs yielded just 24, boding well for Australia’s plans of packing their batting and using Maxwell, together with support from Stoinis and Mitchell Marsh, as the fifth bowler.
Hard-fought as this victory was, Australia will expect sterner tests ahead. The great sadness for South Africa is that it is easy to envisage their side being genuine contenders. Add in Faf du Plessis opening the batting, the all-round skills of Chris Morris, the leg spin of Imran Tahir - let alone the magisterial batting of AB de Villiers - and they would be a team to challenge all-comers.
01:31 PMAustralia sneak home!
Australia sneak home!
They made very hard work of that. Fair to say both Australia and South Africa look stronger with the ball then the bat.
What a match to start to Super 12s.
01:30 PMOVER 20: AUS 117/5 (Stoinis 20* Wade 15*)
OVER 20: AUS 117/5 (Stoinis 20* Wade 15*)
Can Pretorius pull a rabbit out of the hat for his side? He has not got many runs to play with to try and secure his side a historic win.
A full toss is hit into the leg side for a well ran two. Stoinis then creams the ball past the bowler for four! He nailed that. Justin Langer is loving it in the dugout.
Australia need two to win from four balls. The fielders are all in the ring - and Stoinis hits is straight to mid-off. No run.
Stoinis launches a full toss into the leg side for four - and that is that! Australia win with two balls to spare.
01:26 PMOVER 19: AUS 111/5 (Stoinis 14* Wade 15*)
OVER 19: AUS 111/5 (Stoinis 14* Wade 15*)
Australia have struggled in this format recently, especially chasing low totals. Can they get over the line this time? They need 18 from 12 to win.
Nortje to bowl. He starts with a full toss which Wade squirts away for one. Stoinis hammers the next ball back at Nortje who gets a finger on it - Australia scamper two. A single follows. Wade picks out third man once more.
A slower ball is hit by Stoinis just over mid-wicket in the ring and it trickles away for four! Huge moment in the match. Stoinis keeps the strike - Australia need eight to win off the final over.
01:19 PMOVER 18: AUS 101/5 (Stoinis 6* Wade 13*)
OVER 18: AUS 101/5 (Stoinis 6* Wade 13*)
Here is Pretorius - who does not normally bowl at this stage of the innings. Australia need 25 from 18 deliveries.
Stoinis walks across his stumps and scoops the ball out to mid-wicket for one. Pretorius fires down a wide just outside the marker. Wade pushes one out to deep cover.
Stoinis smokes it out to long-off for just one. Wade walks outside off stumo, looking to scoop, but is forced to dab it into the offside due to the wide line. A slower ball follows which Stoinis clubs for another single - 100 up! And another sinlge closes out the over, seven coming off it.
01:13 PMOVER 17: AUS 94/5 (Stoinis 3* Wade 10*)
OVER 17: AUS 94/5 (Stoinis 3* Wade 10*)
Rabada starts his last over with a full toss that is clipped for one by Stoinis. Wade hands him back the strike. Stoinis repeats the favour.
Big moment! Wade hits the ball in the air, it falls just short of Markram at mid-off - he misses it completely and the ball runs away for four. He went for the catch and it did not pay off. Rabada responds with a yorker that is just kept out.
Wade wanders outside his off stump and scoops the ball over short fine leg for four. Outstanding batting. Australia back on top after that over.
01:09 PMPretorius still has two overs to bowl
An impressive comeback from South Africa, but their tactic of frontloading their bowlers leaves Dwaine Pretorius with two overs at the death, a phase in which he’s bowled just 8 overs since the start of 2018. Could this be something Australia look to target?#T20WorldCup #AUSvSA
— The CricViz Analyst (@cricvizanalyst) October 23, 2021
01:08 PMOVER 16: AUS 83/5 (Stoinis 1* Wade 1*)
Pretorius still has two overs to bowl
An impressive comeback from South Africa, but their tactic of frontloading their bowlers leaves Dwaine Pretorius with two overs at the death, a phase in which he’s bowled just 8 overs since the start of 2018. Could this be something Australia look to target?#T20WorldCup #AUSvSA
— The CricViz Analyst (@cricvizanalyst) October 23, 2021
01:08 PMOVER 16: AUS 83/5 (Stoinis 1* Wade 1*)
OVER 16: AUS 83/5 (Stoinis 1* Wade 1*)
Wade is in at no 7. Neither batsmen has faced yet. Bavuma has put himself in at slip.
Wade clips a single to get off the mark. Stoinis reverse sweeps his first ball for no run - brave. Shamsi then nearly slides a quicker one past Stoinis' defence. Well bowled. A single ends a superb over from Shamsi. Great spell.
Australia need 36 from 24.
01:04 PMWICKET! Maxwell b Shamsi 18
WICKET! Maxwell b Shamsi 18
Maxwell attempts the reverse sweep and is comprehensively bowled. Stumps everywhere!
South Africa are back in this!
FOW: 81/5
01:03 PMOVER 16: AUS 81/4 (Stoinis 0* Maxwell 18*)
OVER 16: AUS 81/4 (Stoinis 0* Maxwell 18*)
Shamsi starts his final over. Maxwell smokes the ball back at him but the spinner stops it with his boot. Ouch.
01:01 PMOVER 15: AUS 81/4 (Stoinis 0* Maxwell 18*)
OVER 15: AUS 81/4 (Stoinis 0* Maxwell 18*)
The change has paid off for Bavuma. Stoinis comes to the crease with a job to do. Maxwell is on strike and takes one from the last ball of the over.
01:00 PMWICKET! Smith c Markram b Nortje 35
WICKET! Smith c Markram b Nortje 35
Nortje delivers an identical ball and Smith plays the same shot - but this time Markram manages to get around from long-on to take a stunning diving catch! Superb fielding.
FOW: 80/4
12:59 PMOVER 15: AUS 80/3 (Smith 35* Maxwell 17*)
OVER 15: AUS 80/3 (Smith 35* Maxwell 17*)
South Africa desperately need a wicket and Bavuma has brought back Nortje to do just that. A leg bye starts the over.
Smith drives nicely but cannot beat the fielder in the ring. No run. Nortje then hits Smith on the pads who had shuffled across the crease. The decision is not out and SA do not review. It looked a touch high.
Nortje bangs it in and Smith pulls it over mid-wicket for four. He picks up length so well.
12:55 PMOVER 14: AUS 75/3 (Smith 31* Maxwell 17*)
OVER 14: AUS 75/3 (Smith 31* Maxwell 17*)
Shamsi's first ball is reversed sweeped over short third man's head for four by Maxwell. Better intent from Australia in the last two overs. Maxwell drives down the ground for one. Smith blocks a challenging ball from Shamsi before hitting the ball past the bowler for a single. Maxwell executes another reverse sweep, this time only for one.
Australia need 44 from 36 to win.
12:51 PMOVER 13: AUS 68/3 (Smith 30* Maxwell 11*)
OVER 13: AUS 68/3 (Smith 30* Maxwell 11*)
Australia are clearly planning on taking this deep. But they are three down and the required run rate is slowly climbing. Good it come back to bite them?
Maharaj starts his final over with a dot before Smith pushes one. Maxwell has had enough and tries to send the ball out of the ground. He shanks it, collecting one. Smith then rocks onto the back foot, punching the ball through the covers for four. Outstanding placement. Smith takes a single, Maxwell does the same.
Good over for Australia.
12:48 PMOVER 12: AUS 60/3 (Smith 24* Maxwell 9*)
OVER 12: AUS 60/3 (Smith 24* Maxwell 9*)
Pretorius continues and Smith nearly chips the ball straight back to him! The ball just died on him. No run. A single into the leg side follows. Maxwell takes one. Smith drives and backward points misfields, allowing a run to be collected.
Maxwell hits the ball hard through the covers but just one run added to the total. Smith does the same to keep the strike,
12:44 PMOVER 11: AUS 55/3 (Smith 21* Maxwell 7*)
OVER 11: AUS 55/3 (Smith 21* Maxwell 7*)
Maharaj is back into the attack. Maxwell clips him for one into the leg side. Smith hands him back the strike. Maxwell repeats the favour. Smith does the same, Australia content to knock it around. A dot ball breaks the run of singles before a quicker one is fired down the leg side. It flicks the bad of Maxwell before being caught by de Kock.
Four from the over.
12:38 PMOVER 10: AUS 51/3 (Smith 19* Maxwell 5*)
OVER 10: AUS 51/3 (Smith 19* Maxwell 5*)
Pretorius, SA's fifth bowler, is finally into the attack. His first ball is pushed for one by Smith out to deep cover. Pretorius then nips one past the outside edge of Maxwell. That was close. Maxwell gets off strike. A dot ball to Smith follows. Pretorius over-pitches and Smith drives down the ground for an elegant single - 50 up!
Maxwell will keep the strike.
Australia need 68 from 60 to win.
12:34 PMOVER 9: AUS 47/3 (Smith 17* Maxwell 3*)
OVER 9: AUS 47/3 (Smith 17* Maxwell 3*)
Shamsi continues. Maxwell takes one, Smith does the same. Maxwell hands the strike to Smith who cuts a short ball fine and for four. Shamsi floats up a tempter, Smith goes for the drive and inside edges the ball just past the stumps before just making it home to collect one. That was very close.
12:30 PMOVER 8: AUS 39/3 (Smith 11* Maxwell 1*)
OVER 8: AUS 39/3 (Smith 11* Maxwell 1*)
In-form Maxwell strides to the crease in a cap. He gets off the mark from his first ball.
12:29 PMWICKET! Marsh c van der Dussen b Maharaj 11
WICKET! Marsh c van der Dussen b Maharaj 11
Marsh tries to launch the ball over mid-wicket and van der Dussen plucks the ball out of the air a few yards from the boundary! Marsh looked antsy against the spinners.
SA are well and truly in this.
FOW: 38/3
12:27 PMOVER 8: AUS 38/2 (Smith 11* Marsh 11*)
OVER 8: AUS 38/2 (Smith 11* Marsh 11*)
Maharaj continues. Smith works a single before Marsh drives powerfully for a couple. He then hands Smith back the strike. The favour is repeated.
12:25 PMOVER 7: AUS 33/2 (Smith 9* Marsh 8*)
OVER 7: AUS 33/2 (Smith 9* Marsh 8*)
Shamsi, the left-arm leggie, and world's no 1 ranked T20 bowler, begins his spell with a loosener which Smith works for two before getting off strike. Shamsi starts with a dot to Marsh who then rocks back, pulling the ball for one. Smith hands him back the strike. Five from the over.
12:21 PMSo you're saying there's a chance...
The wicket of David Warner has helped boost South Africa's win percentage up to 20% with WinViz, there's still hope for them yet if they can consistently pick up wickets.#T20WorldCup #AUSvSA
— The CricViz Analyst (@cricvizanalyst) October 23, 2021
12:21 PMOVER 6: AUS 28/2 (Smith 5* Marsh 7*)
So you're saying there's a chance...
The wicket of David Warner has helped boost South Africa's win percentage up to 20% with WinViz, there's still hope for them yet if they can consistently pick up wickets.#T20WorldCup #AUSvSA
— The CricViz Analyst (@cricvizanalyst) October 23, 2021
12:21 PMOVER 6: AUS 28/2 (Smith 5* Marsh 7*)
OVER 6: AUS 28/2 (Smith 5* Marsh 7*)
Maharaj, the left-arm spinner, is into the attack for the last over of the powerplay. His first ball is clipped for a single by Smith. Marsh does the same. Smith then punches a single into the offside. A dot ball is followed by a lofted drive from Marsh for two over the bowler's head.
Five from the over. Powerplay belongs to SA.
12:18 PMOVER 5: AUS 23/2 (Smith 3* Marsh 4*)
OVER 5: AUS 23/2 (Smith 3* Marsh 4*)
The gamble to give Rabada a third over on the spin has paid of. Good captaincy from Bavuma.
Smith joins Marsh in the middle. He plays out two dots before pulling a short ball out to the boundary for three after a great stop for Pretorius
12:14 PMWICKET! Warner c Klaasen b Rabada 13
WICKET! Warner c Klaasen b Rabada 13
A superb slower ball completely does Warner! He is through the shot too early and chips it to Klaasen at point.
Maybe it really is game on?
FOW: 20/2
12:14 PMOVER 5: AUS 20/1 (Warner 13* Marsh 4*)
OVER 5: AUS 20/1 (Warner 13* Marsh 4*)
Rabada starts his third over - Bavuma wants wickets now! He strays short and wide and Warner crunches a cut shot for four.
12:12 PMOVER 4: AUS 16/1 (Warner 9* Marsh 4*)
OVER 4: AUS 16/1 (Warner 9* Marsh 4*)
Nortje strays onto the pads of Marsh who clips it elegantly away for four. He tries to repeat the shot but gets struck on the thigh pad. A full ball is driven firmly back at the bowler who stops it going for any runs. Nortje bangs it in short and hits Marsh on the hip this time. Nortje is rapid and is hurrying the batsmen.
Five dot balls following the boundary.
12:07 PMOVER 3: AUS 12/1 (Warner 9* Marsh 0*)
OVER 3: AUS 12/1 (Warner 9* Marsh 0*)
Rabada digs a short one in and Warner hooks it away for a one-bounce four. Rabada responds well, delivering successive dot balls. He then over-pitches and Warner nails a drive through the covers for four. Lovely timing.
Rabada responds well once more, sending the ball into the ribs of Warner. This pitch is providing plenty of carry.
A full toss - which is just under no-ball height - ends the over. Warner could not do anything with it due to its speed at 90mph.
12:04 PMOVER 2: AUS 4/1 (Warner 1* Marsh 0*)
OVER 2: AUS 4/1 (Warner 1* Marsh 0*)
Marsh is in at no 3. He is beaten all ends up by a quick Nortje delivery. Terrific start from the SA quicks.
12:03 PMWICKET! Finch c Rabada b Nortje 0
WICKET! Finch c Rabada b Nortje 0
Finch clips Nortje off his hip and it goes straight down the throat of Rabada at fine leg! The Australian captain is gone for a duck! Game on?
FOW: 4/1
12:02 PMOVER 2: AUS 4/0 ( Warner 1* Finch 0*)
OVER 2: AUS 4/0 ( Warner 1* Finch 0*)
Nortje starts from the other end. Warner tries to lauch a drive from his first ball but he gets nowhere near it. Warner struggled for form in the IPL this year and looked a shadow of his former self. Two more dot balls follow. Nortje then slides one down the leg side - wide given.
Warner drops and runs into the leg side.
11:58 AMOVER 1: AUS 2/0 ( Warner 1* Finch 0*)
OVER 1: AUS 2/0 ( Warner 1* Finch 0*)
It will be Rabada to start for South Africa. He starts back of a length to Warner who pushes the ball into the offside for no run. He then scampers a quick single as Miller misses the stumps with a diving throw.
Finch's first ball is chipped up towards the bowler after the Australian captain came down the pitch but Rabada cannot quite get to it. Rabada then whizzes one past Finch's outside edge. A wide down the leg side follows.
Rabada rediscovers his line and length to conclude an impressive opening over.
11:50 AMNot an ideal start to the tournament for South Africa...
South Africa’s score of 118-9 today is their lowest batting first in a 20 over game at a T20 World Cup. Their previous lowest was 122/8 against West Indies in Nagpur during the 2016 edition.#T20WorldCup #AUSvSA
— The CricViz Analyst (@cricvizanalyst) October 23, 2021
11:42 AMAustralia need 119 to win...
Not an ideal start to the tournament for South Africa...
South Africa’s score of 118-9 today is their lowest batting first in a 20 over game at a T20 World Cup. Their previous lowest was 122/8 against West Indies in Nagpur during the 2016 edition.#T20WorldCup #AUSvSA
— The CricViz Analyst (@cricvizanalyst) October 23, 2021
11:42 AMAustralia need 119 to win...
Australia need 119 to win...
They should do this, but 119 just gives South Africa a tiny sniff if they can take early wickets.
11:41 AMOVER 20: SA 118/9 (Shamsi 0* Rabada 20*)
OVER 20: SA 118/9 (Shamsi 0* Rabada 20*)
Shamsi is on strike with two balls remaining in the innings. A yorker is speared in and misses the off stump by an inch. A bye is scrambled. Rabada hits a full toss for two over the leg side. Shamsi just got home with a dive.
11:39 AMWICKET! Nortje c Finch b Starc 2
WICKET! Nortje c Finch b Starc 2
Nortje tries to launch the ball over extra-cover but just ends up chipping it straight to him.
FOW: 115/9
11:38 AMOVER 20: SA 115/8 (Nortje 2* Rabada 18*)
OVER 20: SA 115/8 (Nortje 2* Rabada 18*)
Starc goes full and Rabada hits it down the ground for a well ran two. A full toss is then sent back over the head of Starc for a big six! Top striking from the quick bowler. The left armer responds well with a yorker which is squirted away for one leg bye.
11:34 AMOVER 19: SA 106/8 (Nortje 2* Rabada 9*)
OVER 19: SA 106/8 (Nortje 2* Rabada 9*)
Can South Africa fight their way up to 120 with two overs remaining?
Cummins starts his final over with a yorker to Rabada. No run. A full toss is then launched into the leg side for two. Rabada missed out there.
A slower ball bouncer deceives Rabada. Nicely bowled. A leg bye is then scrambled. A superb wide yorker beats Nortje but Wade misfields and a bye is scrambled. A quick single concludes the penultimate over. Rabada will start the final over on strike.
11:30 AMOVER 18: SA 101/8 (Nortje 2* Rabada 6*)
OVER 18: SA 101/8 (Nortje 2* Rabada 6*)
Nortje arrives at the crease with his side in a dire situation. Rabada is on strike and blocks a yorker. He then clubs the ball along the ground to short mid-wicket. No run. Another dot follows before Rabada squirts a single out to deep cover.
Nortje works a full toss for two out to deep third man. 100 up for SA...
11:26 AMWICKET! Markram c Maxwell b Starc 40
WICKET! Markram c Maxwell b Starc 40
Starc is back to see out the innings from one end. He is around the wicket to Markram who clips the ball down the throat of deep mid-wicket! South Africa's hope is removed.
FOW: 98/8
11:24 AMOVER 17: SA 98/7 (Markram 40* Rabada 5*)
OVER 17: SA 98/7 (Markram 40* Rabada 5*)
Hazlewood returns for his final over. His first ball is deposited into the stands by Markram - he really got hold of that. This is more like it...
A wide follows. Markram then inside edges a full ball for one. Hazlewood finds his line and length to Rabada. Dot ball. Rabada then clubs the ball over Hazlewood's head for four. A yorker is Hazlewood's response. No run. Another yorker sees out Hazlewood's spell.
12 from the over.
11:18 AMOVER 16: SA 86/7 (Markram 33* Rabada 1*)
OVER 16: SA 86/7 (Markram 33* Rabada 1*)
Zampa starts his final over with a single conceded to Markram. Rabada hands him back the strike. It feels like SA neeed to have a dart here. No point finishing on 110...
Markram works another single. Three from the over. Zampa finishes with 2-21. Superb stuff.
11:15 AMOVER 15: SA 83/7 (Markram 31* Rabada 0*)
OVER 15: SA 83/7 (Markram 31* Rabada 0*)
That calamity was fitting for this innings in all honesty. Cummins starts with a dot to Rabada. He then hits Rabada on the helmet with a steepling bouncer out. It hit him on his chest before richocheting onto the helmet. Rabada is ok.
A dot ball finishes the over.
11:12 AMWICKET! Maharaj run out (Maxwell) 0
WICKET! Maharaj run out (Maxwell) 0
Oh dear, oh dear. Maharaj drops the ball and turns down a run. A throw at the stumps nearly runs out Markram who had started to run. It looks like an overthrow is possible so Maharaj starts running, only to be turned back three-quarters of the way down. He is run out comfortably as he returns to his crease. Get all that?
FOW: 83/7
11:10 AMOVER 15: SA 83/6 (Markram 31* Maharaj 0*)
OVER 15: SA 83/6 (Markram 31* Maharaj 0*)
Australia are running riot here. Every time SA get a partnership going a wicket halts their momentum. Markram takes a single of Cummins, handing strike to Maharaj who feels a tad high at no 8. He blocks his first ball.
11:08 AMWICKET! Pretorius c Wade b Zampa 1
WICKET! Pretorius c Wade b Zampa 1
Pretorius rocks back and attempts a cut shot, he gets a thin edge to Wade who takes a fine catch behind the stumps.
FOW: 82/6
11:07 AMOVER 14: SA 82/5 (Markram 30* Pretorius 1*)
OVER 14: SA 82/5 (Markram 30* Pretorius 1*)
Australia are into the all-rounders as Pretorius joins Markram at the crease. Zampa starts with a googly and Pretorius just gets enough bat on it to get off the mark. Markram takes one, content just to tick along with wickets falling at the other end.
11:05 AMWICKET! Miller lbw Zampa 16
WICKET! Miller lbw Zampa 16
Miller attempts a sweep and misses it completely. It strikes him in front and Michael Gough swiftly raises his finger.
Miller reviews it - but it looks pretty dead to me. Ball tracking shows the ball to be hitting three-quarters of the way up middle.
FOW: 80/5
11:03 AMOVER 14: SA 80/4 (Markram 29* Miller 16*)
OVER 14: SA 80/4 (Markram 29* Miller 16*)
Zampa is back for his third over. Markram takes one from the opening ball. Miller then pushes a couple through the offside.
11:00 AMOVER 13: SA 77/4 (Markram 28* Miller 14*)
OVER 13: SA 77/4 (Markram 28* Miller 14*)
The superb Hazlewood returns. Miller drops and runs, Wade picks up the ball and executes a direct hit - Miller was just about home. Markram gives him back the strike. Another quick single follows. Markram connects nicely for one down the ground.
Miller flicks two off his hips, decisive running. Hazlewood responds by banging it in. Dot ball.
South Africa need to start thinking about accelerating.
10:56 AMOVER 12: SA 71/4 (Markram 26* Miller 10*)
OVER 12: SA 71/4 (Markram 26* Miller 10*)
Maxwell starts the final ball of his spell. Markram punches a single. Miller tries an expansive pull shot but does not connect - one added to the total.
A quicker ball almost sneaks past the bat of Markram. He gets off strike before Miller scrambles a quick single.
Maxwell's last ball is too short and it is cut for four. Maxwell is furious. His spell was superb until that ball. Still, figures of 1-24 is very handy.
10:52 AMOVER 11: SA 63/4 (Markram 20* Miller 8*)
OVER 11: SA 63/4 (Markram 20* Miller 8*)
Zampa is back into the attack. A dot is followed by a two worked into the leg side by Miller. He then hits the ball back at Zampa who cannot stop it - a single is scampered. Markram hands him back the strike immediately.
Miller is caught on the crease by Zampa. No run. A dot ends an excellent over for Australia.
10:48 AMAustralia have found the length to bowl on this pitch
66% of Australia’s deliveries from pacers have pitched in the 6-9 metre region, picking up 3 wickets and conceding just 3.60 rpo. Hazlewood and Cummins are notorious for consistently hitting that back of a length area and it's delivered for them today.#T20WorldCup #AUSvSA
— The CricViz Analyst (@cricvizanalyst) October 23, 2021
10:46 AMOVER 10: SA 59/4 (Markram 19* Miller 5*)
Australia have found the length to bowl on this pitch
66% of Australia’s deliveries from pacers have pitched in the 6-9 metre region, picking up 3 wickets and conceding just 3.60 rpo. Hazlewood and Cummins are notorious for consistently hitting that back of a length area and it's delivered for them today.#T20WorldCup #AUSvSA
— The CricViz Analyst (@cricvizanalyst) October 23, 2021
10:46 AMOVER 10: SA 59/4 (Markram 19* Miller 5*)
OVER 10: SA 59/4 (Markram 19* Miller 5*)
The impressive Maxwell returns for his third over. He starts with a dot before the left-handed Miller clips a comfortable two. A single follows. Maxwell drops short but Markram cannot cash in, finding the fielder at coverr. He works a single into the leg side.
Miller ends the over with one. He will keep the strike.
10:43 AMA stat for South African fans...
This is the 7th time South Africa have lost 3 wickets inside the Powerplay when batting first since the last T20 World Cup, they've gone on to win 3 of those games.#T20WorldCup #AUSvSA
— The CricViz Analyst (@cricvizanalyst) October 23, 2021
10:43 AMOVER 9: SA 54/4 (Markram 18* Miller 1*)
A stat for South African fans...
This is the 7th time South Africa have lost 3 wickets inside the Powerplay when batting first since the last T20 World Cup, they've gone on to win 3 of those games.#T20WorldCup #AUSvSA
— The CricViz Analyst (@cricvizanalyst) October 23, 2021
10:43 AMOVER 9: SA 54/4 (Markram 18* Miller 1*)
OVER 9: SA 54/4 (Markram 18* Miller 1*)
Starc returns. He starts with a dot to Markram who then clips him for a couple through the leg side. A crunching drive through extra cover follows. Four runs. Markram takes one, handing Miller the strike for the first time.
He is gifted a full toss and clips it away for one. Starc attempts a yorker and Markram just keeps it out.
South Africa are currently going exactly at six an over.
10:38 AMWICKET! Klaasen c Smith b Cummins 13
WICKET! Klaasen c Smith b Cummins 13
Cummins does Klaasen with a slower ball. Klaasen is through the shot too early and chips it to Smith at backward point. Klaasen was looking good, that feels like a big wicket.
FOW: 46/4
10:37 AMOVER 8: SA 46/3 (Markram 11* Klaasen 13*)
OVER 8: SA 46/3 (Markram 11* Klaasen 13*)
Cummins continues. He is clipped for one by Markram. Klaasen then nails a cover drive to the boundary. He looks in good touch. A single follows.
Cummins finds a good line and length to Markram. No run. He flicks a single.
10:33 AMOVER 7: SA 39/3 (Markram 9* Klaasen 8*)
OVER 7: SA 39/3 (Markram 9* Klaasen 8*)
Zampa, the leggie, is into the attack. A leg bye starts his spell. Markram takes a single and then Klaasen cuts away with power but some top fielding from Marsh limits it to three. A single from Markram follows.
Klaasen slog sweeps for four. Good aggression from the no 5. Zampa responds with a slider that nearly hits the stumps.
10 from the over.
10:29 AMOVER 6: SA 29/3 (Markram 7* Klaasen 1*)
OVER 6: SA 29/3 (Markram 7* Klaasen 1*)
Cummins is into the attack for the first time. He tucks up Markram, no run. And repeat. Markram walks across the crease, trying to create room to access the leg side but he misses it completely.
Markram punches through the offside for four. Shot of the day! There are no demons in this pitch, despite the scoreline. Markram scrambles a single. Klaasen then takes one. That's the powerplay done.
10:25 AMThat's one way to separate out fans...
Obsessed with the seating enclosures at the T20 World Cup #AUSvSA pic.twitter.com/IE8xyqkAI9
— Roushan Alam (@roushanalam) October 23, 2021
10:24 AMOVER 5: SA 23/3 (Markram 2* Klaasen 0*)
That's one way to separate out fans...
Obsessed with the seating enclosures at the T20 World Cup #AUSvSA pic.twitter.com/IE8xyqkAI9
— Roushan Alam (@roushanalam) October 23, 2021
10:24 AMOVER 5: SA 23/3 (Markram 2* Klaasen 0*)
OVER 5: SA 23/3 (Markram 2* Klaasen 0*)
Klaasen is in earlier than expected. Hazlewood maintains an excellent line, starting with five dots to Klaasen - wicket maiden!
10:21 AMWICKET! de Kock b Hazlewood 7
WICKET! de Kock b Hazlewood 7
Oh dear. De Kock tries to scoop Hazlewood. The ball hits his thigh pad and slowly trickles towards the stumps, knocking off the bails.
Huge wicket for Australia.
FOW: 23/3
10:19 AMOVER 4: SA 23/2 (Markram 2* de Kock 7*)
OVER 4: SA 23/2 (Markram 2* de Kock 7*)
Maxwell will continue after an impressive opening over. A dot is followed by a single from Markram. De Kock then drives extravagantly through the covers for no run. Maxwell drops a tad short and de Kock rocks onto the back foot and pulls it for four. The offie responds with a dot.
De Kock will keep the strike.
10:17 AMOVER 3: SA 17/2 (Markram 1* de Kock 2*)
OVER 3: SA 17/2 (Markram 1* de Kock 2*)
Hazlewood gets an edge from his second ball too, but this time it runs down to third man. Markram off the mark.
Hazlewood was superb in the IPL and has continued is form here. He nips a ball into the pads of left-handed de Kock - no run. And repeat. The next ball generates a dot ball too.
10:12 AMWICKET! van der Dussen c Wade b Hazlewood 2
WICKET! van der Dussen c Wade b Hazlewood 2
Hazlewood starts his spell with a beauty. The ball nips away off a full length, getting a thin edge through to the keeper. Australia now on top!
FOW: 16/2
10:11 AMOVER 2: SA 16/1 (van der Dussen 2* de Kock 2*)
OVER 2: SA 16/1 (van der Dussen 2* de Kock 2*)
Van der Dussen - who was in great touch in the warm-ups - strides out to the crease and clips a single from his first ball. De Kock pulls a short ball for one before van der Dussen pinches the strike.
10:08 AMWICKET! Bavuma b Maxwell 12
WICKET! Bavuma b Maxwell 12
The part-timer has struck! The move from Finch pays off as he slides on past the bat of Bavuma and into the stumps!
FOW: 13/1
10:07 AMOVER 2: SA 13/0 (Bavuma 12* de Kock 1*)
OVER 2: SA 13/0 (Bavuma 12* de Kock 1*)
Maxwell will open from the other end with his part-time offies - and a woeful new haircut, it must be said.
Bavuma flicks the ball for one through mid-wicket. De Kock hands him back the strike the following ball.
10:04 AMOVER 1: SA 11/0 (Bavuma 11* de Kock 0*)
OVER 1: SA 11/0 (Bavuma 11* de Kock 0*)
Starc will deliver the first over. He shapes the ball into Bavuma who pushes the ball through the offside for two. The South African captain defends the second delivery before crunching a drive through the covers for four! What a shot! And repeat. Bavuma guides this drive slightly squarer but still all the way to the boundary.
The strike is handed to de Kock for the first time with a run down to third man. Starc bangs it in and de Kock misses out.
Great start for South Africa.
10:00 AMHere we go!
Here we go!
The player are in the middle and ready to start.
09:53 AMAustralia have won the toss and elected to field first
Australia have won the toss and elected to field first
Here are the teams:
Australia
Aaron Finch (c)
David Warner
Mitchell Marsh
Glenn Maxwell
Steven Smith
Marcus Stoinis
Matthew Wade (wk)
Pat Cummins
Mitchell Starc
Adam Zampa
Josh Hazlewood
South Africa
Temba Bavuma (c)
Quinton de Kock (wk)
Aiden Markram
Rassie van der Dussen
David Miller
Heinrich Klaasen
Dwaine Pretorius
Kagiso Rabada
Keshav Maharaj
Anrich Nortje
Tabraiz Shamsi
09:47 AMGood morning and welcome to Telegraph Sport's live coverage of Australia-South Africa
Good morning and welcome to Telegraph Sport's live coverage of Australia-South Africa
Australia captain Aaron Finch believes powerplays will make or break team fortunes at the Twenty20 World Cup, apart from being a potent antidote to the pesky dew factor.
Australia will launch their bid for the only major global trophy that has eluded them with today's Group 1 match against South Africa in Abu Dhabi.
Finch would worry less about the dew factor as only one of their five group matches is a night game, but his experience in the recent Indian Premier League (IPL) tells him the first six overs still remained crucial.
"Even though it's different surfaces to what the IPL used, we saw the impact that had," Finch told a news conference on Friday.
"The teams that won the powerplay went a long way to winning the game as the wickets deteriorated."
Australia got a taste of the dew factor in their warm-up match against New Zealand and Finch had no doubt it would be a headache for the teams.
"As the conditions cool down slightly in the coming month or so, it will probably become heavier and heavier. Then the toss does become really important," he said.
"The way out is making the first six overs count.
"Regardless of how dewy it does get, if you can control that part of the game, it goes a huge distance in winning the match."
Australia have the experience in their batting line-up to master the challenge, said the opener.
To make the powerplays count, Australia will need David Warner to rediscover his form after being dropped by his IPL franchise midway through the UAE leg of the tournament.
Finch was convinced Warner would be back among runs soon.
"I'm backing Davey's ability, I'm backing his judgement. If you look at these World Cup history, it's bloody good," Finch said.
"Would he have liked more runs? Absolutely, everyone would like more runs all the time. He's one of the greatest players Australia has ever produced and I've got no doubts that come game one, he'll be up and firing, ready to go."
Reuters
